![AccountAbility_logo_primary_fullcolor-1.png]](https://knowledgebase.counta.com/hs-fs/hubfs/AccountAbility_logo_primary_fullcolor-1.png?height=40&name=AccountAbility_logo_primary_fullcolor-1.png)
Audience note: This guide is for the admin at your agency who manages your ChatGPT workspace's Apps settings. Registering and publishing a custom connector requires workspace admin access in ChatGPT. Once this step is complete, anyone at your agency with Counta access can connect individually using the Connect to the Counta AI Connector in ChatGPT guide.
Overview
The Counta AI Connector, built on the Model Context Protocol (MCP), lets ChatGPT securely connect to your Counta environment and access master data, transactions, and reports.
Setting up the Counta AI Connector in ChatGPT involves a short exchange with Counta before setup can be completed:
- Counta will provide your OAuth Client ID and Secret, as well as the MCP server URL for the AI Connector.
- Provide Counta with your ChatGPT App Callback URL. Counta requires this to complete the OAuth configuration.
Before you begin:
- Ensure you have access to Counta and know your:
- Tenant ID
- Username (email address)
- Password or API Token
- Have your Counta AI Connector's server URL available for the environment you're setting up (Staging or Production).
- Have the OAuth Client ID and Client Secret provided by Counta.
- Confirm which environment you're setting up first, if your organization has access to both Staging and Production.
Environment note:
The setup process is the same for both Staging and Production. The only difference is the server URL and the OAuth Client ID and Client Secret, all provided by Counta for each environment after you've completed the exchange above for that environment. If your agency uses both, repeat the full process, including the Callback URL exchange, once per environment, and include the environment name in the app name so they're easy to tell apart (for example, "Counta MCP (Staging)").
The Steps section below walks through each screen, including navigating to your ChatGPT workspace admin settings and starting the app creation.
Steps
Developer Mode
Note: Developer Mode is typically already enabled for your agency's ChatGPT workspace. If you don't see the option to create a custom connector, confirm Developer Mode is turned on before continuing.

Initial App Creation
-
Click your workspace icon (bottom-left corner) and select "Workspace Settings", then click"Apps" on the left-hand navigation panel.
-
Click "Create". This brings up a "New App" dialog.
-
The "Advanced OAuth Settings" dialog displays. Paste the Client ID provided by Counta into the ChatGPT OAuth Client ID field.

-
Fill out the following:
- Name: "Counta AI Connector"
- Description: "Governed AI read access to live Counta financial and operational data, and pre-configured reporting datasets, with permission-scoped write actions."
- Connection: Enter the Staging or Production URL from Counta.
- Authentication: Leave the default "OAuth", then click on "Advanced OAuth settings".

-
Paste the OAuth Client ID and OAuth Client Secret provided by Counta into the corresponding fields.
-
Accept the risk acknowledgment for the custom MCP server. The "Create" button will be disabled until you do this. Click "Create" to finalize the connector setup.

The most common connection issues are due to an incorrect Client ID and Client Secret. Confirm that you have copied and pasted the information from the secure credentials record provided by Counta.
Application publication
-
Navigate to your "Draft" apps tab to find the Counta MCP you just created. Click into the app to review the details. Click "Enable" to activate the draft application.

-
Review the potential risk of creating custom apps and confirm that you trust the app. Click "Publish" to make the app available to the workspace.

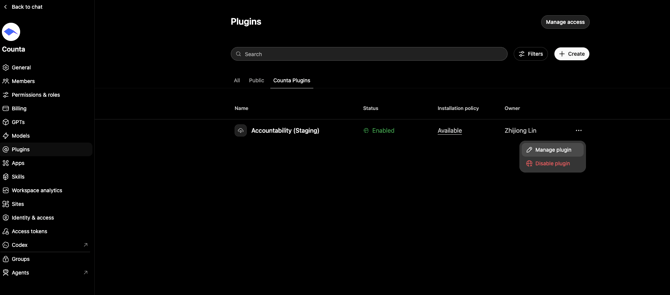
- Once published, the Counta AI Connector will be listed in your workspace's custom plugins. Select the ellipses icon to "Manage plugin".
-
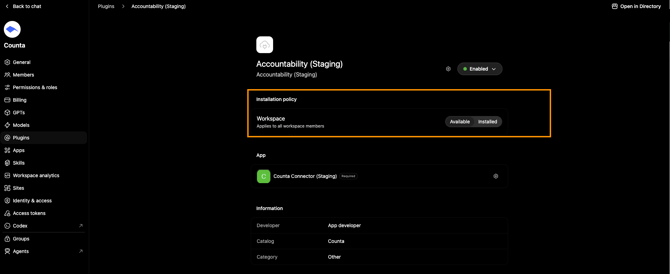
The Installation policy controls how the plugin is distributed to workspace members. In this example, the policy applies to the entire workspace.
- Available: Members can find and install the plugin themselves from the Plugin Directory. It is not automatically added for everyone.
- Installed: The plugin is installed by default for all eligible workspace members.
Installing the plugin does not automatically authorize its required app. Members must still have access to the app/plugin and need to authenticate their own Counta account before using it.
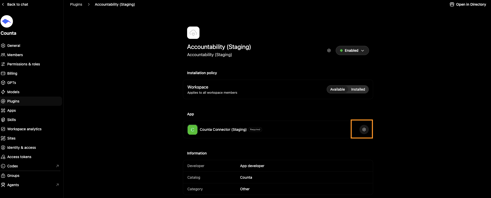
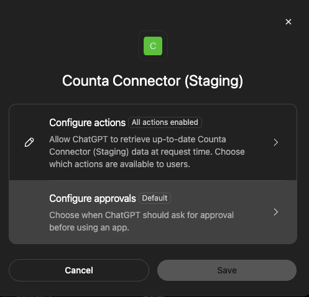
- Click the gear icon next to the Counta Connector to configure actions and approvals.
Configure actions
-
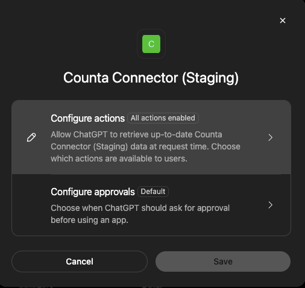
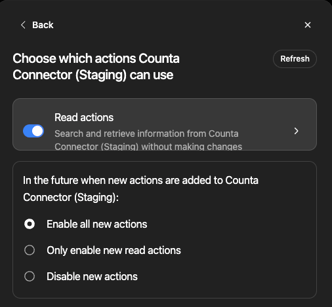
Select "Configure actions" to control which app functions ChatGPT can use.
-
Select "Read actions" to review the individual actions provided by the Counta connector.
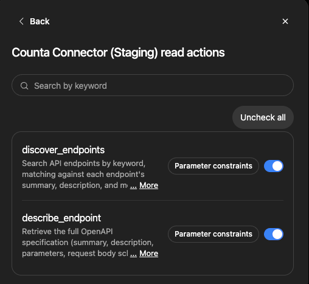
- Turn individual actions on or off using the toggle beside each action. A "Parameter constraints" label indicates that the action limits which inputs ChatGPT may submit. Select the label or "More" to review the available details.
For newly added actions, choose one of these policies:
- Enable all new actions: Automatically makes future read and write actions available.
- Only enable new read actions: Automatically enables new actions that retrieve data, but leaves new write actions disabled.
- Disable new actions: Requires an administrator to enable every newly added action manually.
Configure approvals
-
Select "Configure approvals" to control when ChatGPT must ask the user for confirmation before using the app.
-
The available options are:
- Use workspace default: Applies the approval policy configured for the workspace.
- Always ask: Requires approval before ChatGPT reads information or makes changes.
- Allow read actions: Allows ChatGPT to retrieve information without approval but requires approval before making changes.
- Allow low-risk actions: Automatically approves actions classified as low risk. ChatGPT may still request approval for actions involving sensitive information.
- Allow all actions: Allows ChatGPT to read information and take actions without approval. This carries elevated risk.
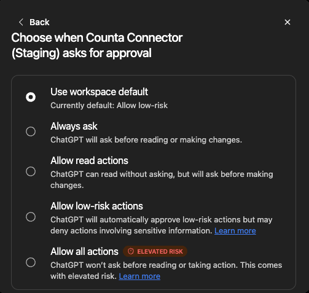
Recommended: Select Allow read actions for production apps. This avoids unnecessary prompts for reports and lookups while still requiring confirmation before data is changed. For a controlled staging environment, Allow low-risk actions may be appropriate when write-action testing is required.
Avoid Allow all actions unless the app, its permissions, and its users have been carefully reviewed.
Authenticate and connect to the Counta AI Connector
Once the connector is published, we recommend testing it yourself first by following the Connect to the Counta AI Connector in ChatGPT guide to authenticate with your own Counta credentials. This confirms the connector is set up correctly before anyone else relies on it.
Once you've confirmed it works, share the same guide with anyone at your agency who needs to connect their own account. Each person authenticates individually with their own Counta credentials; no further admin action is needed per user.