Create a separate WIP account
Define WIP/Advance Billing account at the Job or Task Type Level
What is it?
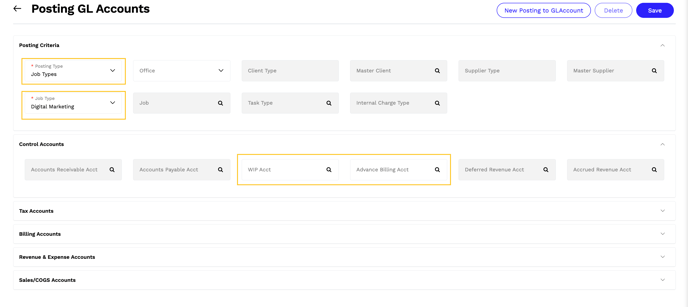
You can now create a Job or Task Type level Posting to GL Account record to override your default WIP and/or Advance Billing Control Account.
Why does it matter?
As an agency, you might need to track billable supplier costs across different services or products. These services or products might be represented as Job Types or Task Types within the platform. This new functionality makes it easier to manage your WIP and Advance Billing balances by service or product.
How does it work?
Before getting started
- Create new GL Account for your secondary WIP/Advance Billing account.
- Determine your current WIP/Advance Billing balance for the specific job type(s) or task type(s) from the general account.
- Export the detailed Aged Work in Progress and Advance Billing Report
- Filter and sum the totals for relevant job types or task types.
- Move the balance for the job or task types to the secondary WIP/Advance Billing account.
- Debit: New WIP/Advanced Billing Account
- Credit: General WIP/Advanced Billing AccountCreate a journal entry to move existing WIP/Advanced Billing Account:
Define posting logic
Future transactions will automatically post based on this logic. You will need to follow steps 2 and 3 in the previous section to move the balances from your general WIP and Advance Billing accounts to your secondary accounts.
- Navigate to Accounting > General Ledger > General Ledger Accounts.
- Click on the the Posting GL Accounts link on the top of the page. This takes you to the Search Posting to GL Accounts page.
- Expand the Filters and set the Posting Type to either Job Type or Task Type to see if there's already a GL Posting record for the Job Type or Task Type. To create a new record, click the
New Posting to GL Accountbutton. - Select a Posting Type of "Job Types" and choose from the list of Job Types available. To set up a Task Type Level posting account, select a Posting Type of "Task Types" and choose from the list of available Task Types.
- Expand the Control Accounts section and choose the WIP Acct and Advance Billing Acct to use for the Posting Type selected.

6. You will need to specify the Billing and Revenue Accounts in the relevant sections. To use your agency's general accounts, open a new tab and navigate to Accounting > General Ledger > General Ledger Accounts and click on the Posting to GL Accounts link. On the Search Posting to GL Accounts page, click Default GL Posting Accounts.