We’re making it easier than ever for approvers to review, organize, and act on expense claims—especially when managing large, high-volume queues.
This release introduces new bulk controls, smarter layout options, and clearer visibility into where each expense originated—helping approvers move faster while maintaining accuracy.
⬇️⬆️ Expand All / Collapse All
Overview
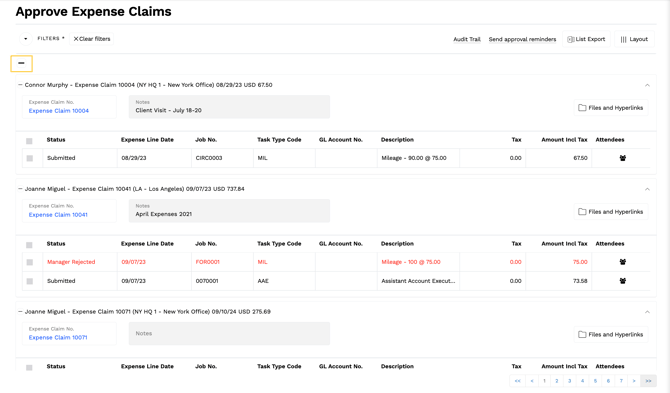
We’ve added global Expand All and Collapse All controls to the Approve Expense Claims page, making it easy to switch between summary and detailed views across your entire approval queue.
Why it matters
Approvers often move between high-level scanning and detailed review. Previously, claims had to be expanded or collapsed one at a time—slowing down workflows when claims contained many line items.
These new controls help you:
-
Reduce repetitive clicking
-
Quickly move between summary and detail views
-
Maintain a consistent display while paging or filtering
-
Work through long approval queues more efficiently
How it works
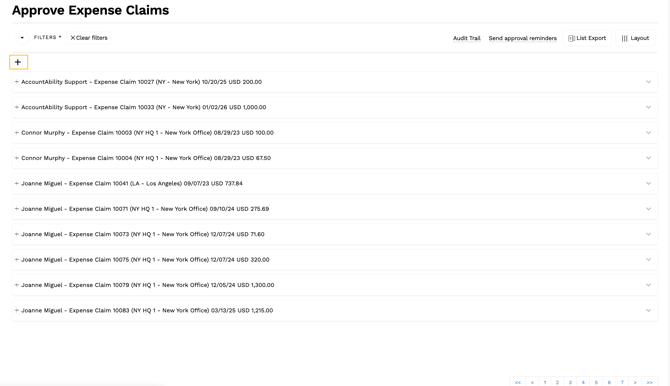
- By default, all expense claims are expanded. Click on the minus symbol (--) to collapse all expense claims.
-
Click on the plus symbol (+) to expand all expense claims.
-
Your selection applies across all pages and filtered results
-
The system remembers your choice for the duration of your session
-
Individual claims can still be expanded or collapsed at any time
📑 Column Sorting from Layout (Including Task Type)
Overview
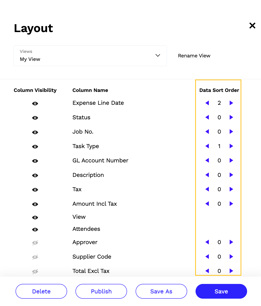
You can now apply sorting directly from the Layout modal—bringing Approve Expense Claims in line with sorting behavior available across the rest of the platform.
For example, you can set Task Type (or any visible column) as a primary sort field to easily sort expense categories within an expense claim.
Why it matters
This makes it easier to organize and prioritize expense lines based on how you work:
-
Group similar expenses together
-
Reduce manual scanning and rework
Your layout and sorting preferences are saved automatically.
How it works
-
Click on the Layout icon.

- In addition to selecting the columns to show/hide, you can now choose which columns to sort and in what order.
- Your layout and sorting selections persist across pages, filters, and sessions until you change them.
- 🏢 Employee Expense Office Visibility
- Overview
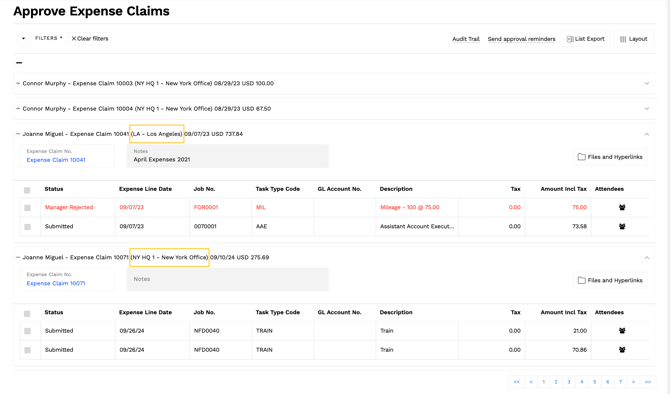
- Approvers can now see the originating Office (Office Code + Office Name) directly on the Approve Expense Claims page and in the approval modal opened from the Expense Approval email.
- The Office is captured at the time the expense claim is created (not pulled directly from the employee record), ensuring accuracy even if an employee later changes offices.
- Why it matters
- This gives approvers immediate context about where each claim originated, helping to:
-
Speed up approvals
-
Reduce routing or review errors
-
Support office-level accountability and audit trails
-
Align Expense workflows with existing PO and Invoice behavior
- How it works
-
The Office now appears in each expense claim header on the Approve Expense Claims page
-
The same Office information is displayed in the approval modal launched from the email link