Interoffice workflow for profit centers (Studio)
Manage profit center revenue for shared client jobs and streamline interoffice billing workflow
On the client job
Overview
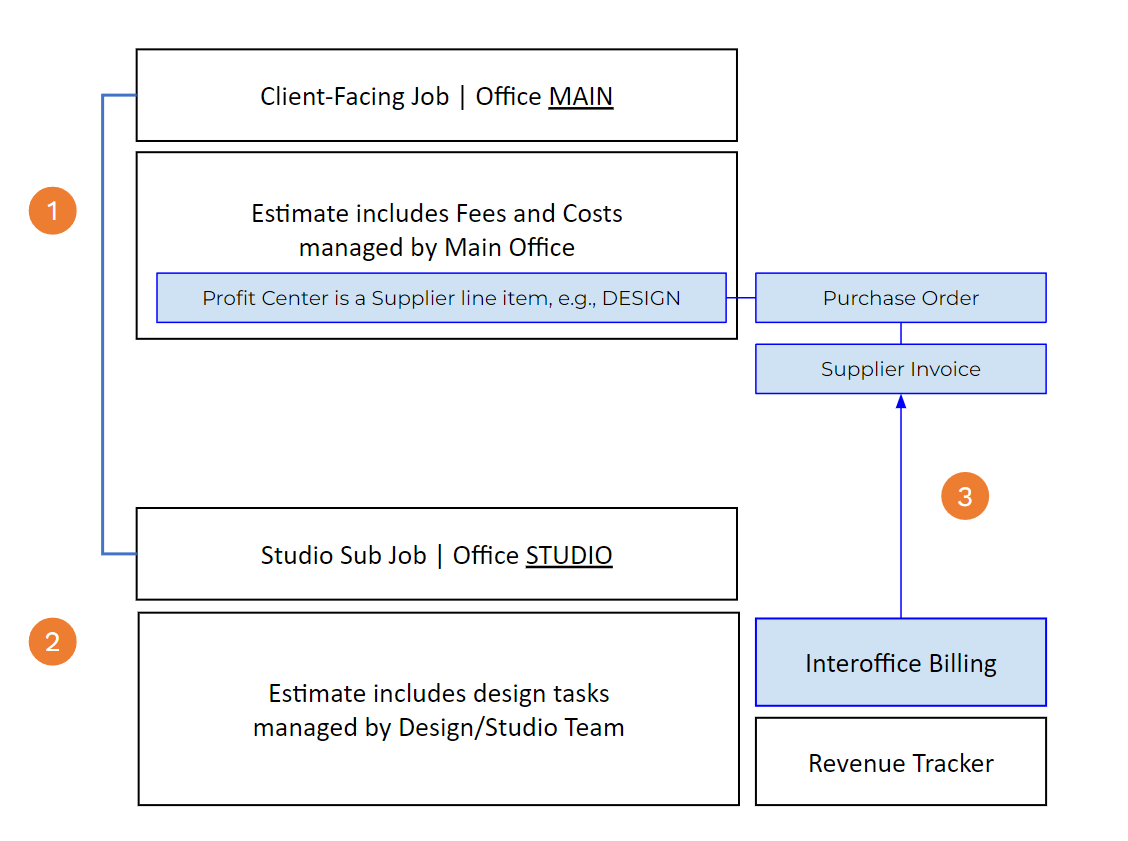
This document walks through the interoffice workflow within Accountability for an agency Design or Studio profit center. This enables the profit center to independently manage its revenue for any client job shared with the primary office. In this scenario:
- The client-facing job (the Parent Job) is assigned to the Main office and the profit center (Design) is a supplier line item on the Estimate with a corresponding PO
- The Sub Job is assigned to the Studio office. The Estimate includes fee line items for design tasks and a revenue tracker with Studio's revenue schedule.
- Interoffice billing from the Studio office (AR) automatically generates a supplier invoice that is reconciled with the corresponding PO in the Main office (AP).

Master data set up
Your Accountability Admin needs to:
- Set up Studio as its own Office within Accountability.
- Assign Studio as the Default Office for employees in the profit center.
- Give Studio employees access to the primary office.
- Assign all Clients to the primary office.
- Set up Studio as a Supplier in the database. Leave the Default Office blank.
- Create Interoffice-specific accounts to separate these transactions.
- Accounts Receivable - Interoffice
- Accounts Payable - Interoffice
- Interoffice pass-through account in lieu of a cash account to post "receipts" and "payments" for interoffice AR and AP transactions. This account needs to be set up as a bank account.
Workflow
In this workflow, the primary (MAIN) office and Studio (STU) are on the same local currency
Job and Sub Jobs creation
- The Brand Team creates a client job in the Main office by navigating to JOBS>Jobs and clicking the Create a New Job button. This job will be used to bill the client.
- If there is a design component of the job that will be managed by the Studio team, click the Sub Job menu option from the job form and create a new sub job.

- Populate the Sub Job details as you would a regular job. The sub job number takes the parent job number and appends a /01 to the first sub job. For example, if the parent job number is JSMGENV0001, the Design/Studio sub job will be JSMGENV0001/01. Ensure that the sub job office is assigned is set to Studio (STU). This sub job will be used for Studio interoffice billing, i.e. Studio bills the main agency for design tasks.

Estimate management and POs
On the Client job:
The Business Affairs Manager creates an Estimate against the client Job. The Estimate can include agency fee and supplier line items.
- Add Design as a supplier charge line item on the client Estimate.

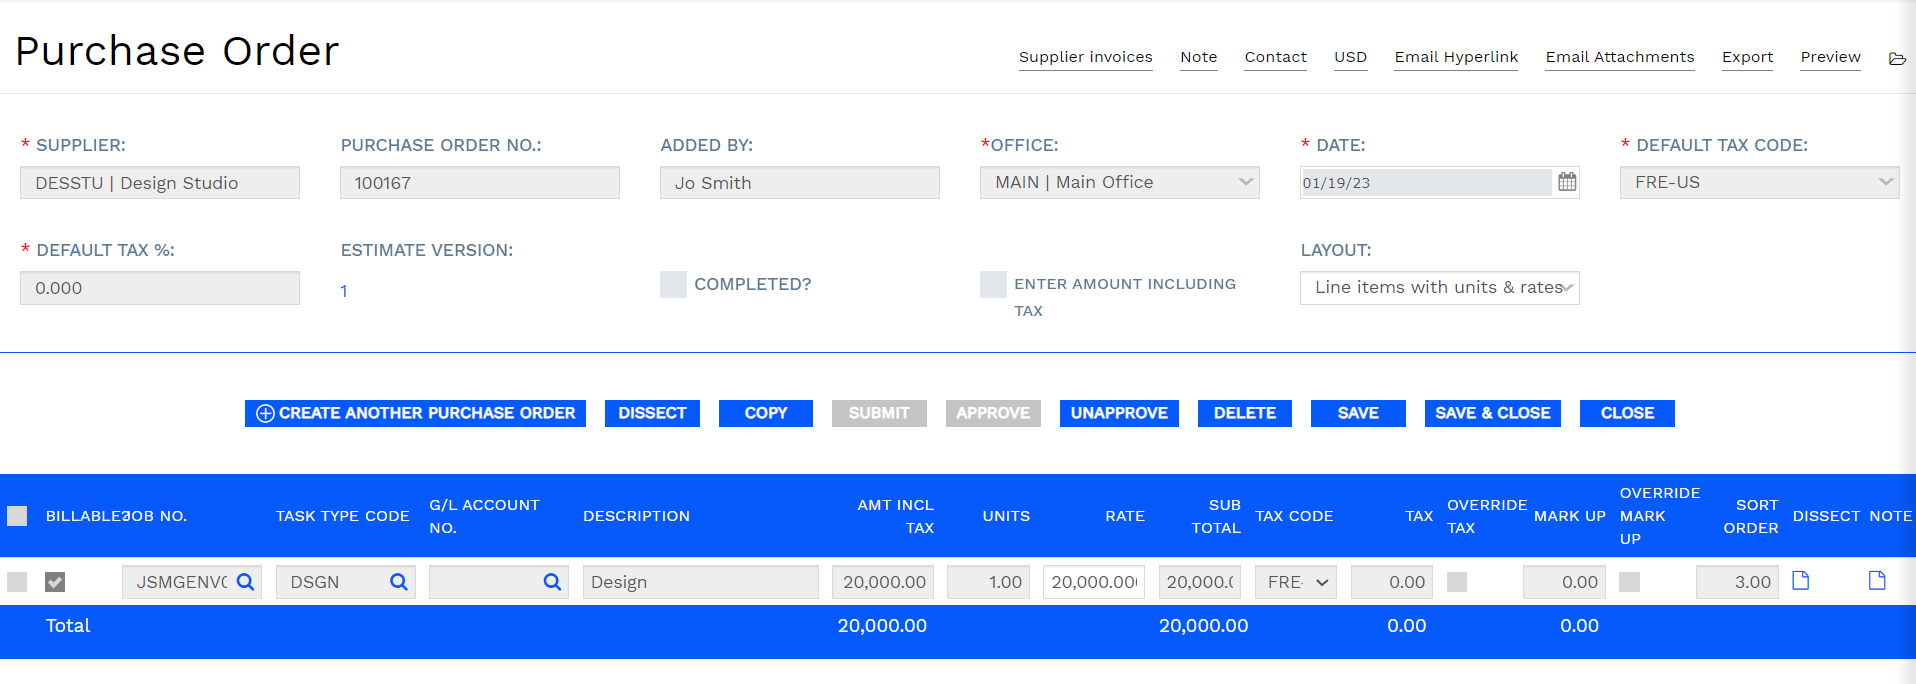
- Optional: Generate a Purchase Order for Design and assign it to the Studio supplier, e.g. DESSTU.
On the Studio sub job:
The Studio Job Manager creates an Estimate against the sub job.
- From the sub job form, select the Estimates menu option. If a PO was generated for Design from the parent job, enter the PO number in Client Order No. field.

- Break out the Design line item from the parent job into the relevant design tasks on the Studio sub job. The Total Estimate amount equals the PO amount from the main job.

Default Tax Code
Update the Default Tax Code on the Estimate to the code that reflects 0%, e.g. VAT 0%.
To learn more about creating an Estimate, see Create an Estimate .
Pro Tip
If you have a superset of Design task types, create an Estimate Template with these task types. Use this template when creating Estimates for new sub jobs. You can the modify the line items (remove task types, add notes, etc.) for each new Estimate.
Revenue management
Accountability’s Revenue Tracker is used to allocate the total agency fee amount across months. Each Estimate (parent and sub job) will have its own Revenue Tracker. This workflow allows for the Studio office to have a different revenue schedule than the primary office. See Estimate Revenue Tracker for a tutorial on revenue tracker creation.
- Select the Revenue Tracker menu option on the top of the Estimate form.

- The Revenue Tracker shows the Total Revenue for Estimate (sum of all fee line items) and how much of that is Unallocated. Enter your revenue allocation across months.

- Use the Add Months function to evenly spread your total estimated revenue across consecutive months. In the example below, I am allocating my estimated revenue of USD 20,000 across four (4) months. Click OK.

Since I have allocated my total estimated revenue, the Unallocated total is now zero. Click Save when you're done.
📽️ Watch the tutorial video on creating a Revenue Tracker here.
Pro Tip
In addition to revenue forecasting, the the revenue tracker can also be used for Revenue Recognition. For details on Revenue Accrual/Deferral based on the revenue tracker, see Revenue Recognition based on Revenue Tracker.
Client invoice
The biller for the primary office generates billing based on the agreed upon schedule with the client. For example, 50% of the total Estimate might be billed in advance.
📽️ Watch the tutorial video on generating client job invoices here.
When the client job invoice is billed, the transaction will post as follows.
| Account | Job No | Task Type | Debit | Credit |
| Revenue | JSMGENV0001 | AGYFEE | 10,000.00 | |
| Advanced Billing | JSMGENV0001 | PROD | 30,000.00 | |
| Advanced Billing | JSMGENV0001 | DESIGN | 10,000.00 | |
| Accounts Receivables | 50,00.00 |
Studio Interoffice Billing
The Studio finance coordinator enables interoffice billing between Studio and the Main office. Interoffice billing rules can be defined at the client or job level.
In this scenario, when the Studio (STU) office bills client JSM, create a supplier invoice in the Main office under the Supplier code DESSTU.

👨🏫 See Interoffice Billing for instructions on setting up client and job defaults.
- On the Studio sub job, you will see an Interoffice Billing link at the top of the page. An asterisk next to it indicates that default rules have been defined. Click on the link to override the current defaults.

- If a client default has not been defined, check the Create Supplier Invoice When the Job Is Billed? option. Enter the office of the parent job and the supplier code that will be used in the supplier invoice auto-generated by the system when the sub job is billed. Click Save.

- Navigate Studio sub job estimate and click on the Client Job Invoices menu option on the top of the page.

Note: The Estimate needs to be approved to generate an estimate invoice. - On the next page, click Create Invoice. The system will bring you to the Client Job Invoice Wizard. The Job No. is automatically populated and Invoice from Estimate is selected by default.

The following fields are populated as follows:
- The Invoice Date defaults to today's date.
- The Accounting Month defaults to the month of the invoice date.
- Payment Terms are looked up from the Client record.
- The Due Date is calculated using Invoice Date and Payment Terms. You can override the Payment Terms or Due Date and the system will adjust the other value accordingly.
- The Contact defaults to the client contact.
Click Next.
- You can bill the full estimate amount or a specific percentage of each line item on the Estimate. The system will only pull in approved estimates.

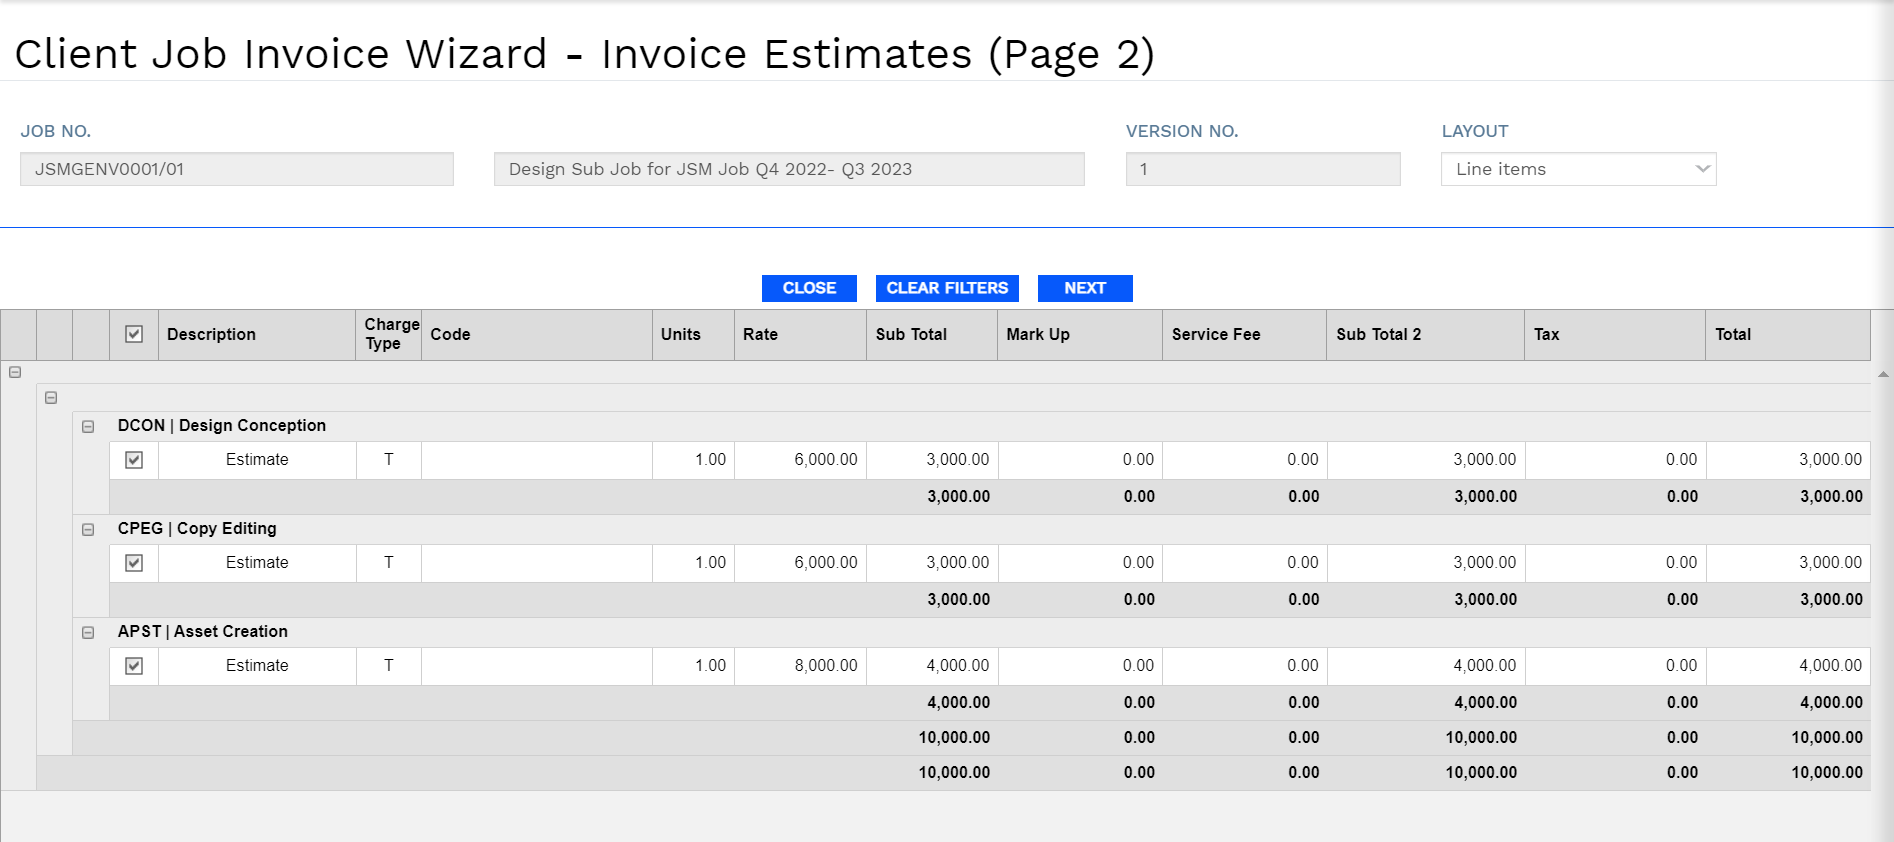
- In this example, I opted to bill 50% of the Studio estimate. You'll see that the Sub Total for each task type is half of the total amount for the line. Click Next.

- The PO number that you entered in the Client Order No. field is automatically populated. Enter header or line item level billing notes to print on the invoice.

Click Create Draft Invoice or Create Final Invoice. - On the last page of the Invoice Wizard, you can select to preview the invoice. Click Finished Invoicing.

- You will be brought to the Client Job Invoice form for the invoice you just generated. From here, you can edit your layout, invoice header notes, or preview the PDF version of the invoice.

- When you approve the invoice, the transaction will post as follows for the Studio office.
| Account | Job No | Task Type | Debit | Credit |
| Revenue | JSMGENV0001/01 | Design Conception | 3,000.00 | |
| Revenue | JSMGENV0001/0 | Copy Editing | 3,000.00 | |
| Revenue | JSMGENV0001/0 | Asset Creation | 4,000.00 | |
| Accounts Receivable - Interoffice | 10,000.00 |
Interoffice billing impact on parent job:
Once the interoffice invoice is approved by the Studio billing manager, the main office will receive a system-generated invoice in its Incoming Supplier Invoice inbox.
- The supplier invoice number is the same as the Studio invoice number. Click on the eye icon to view the actual invoice PDF.
- If a corresponding PO exists, click Add from PO button. You'll be able to select from a list of open purchase orders to match against this invoice. The system will automatically populate the invoice line item details from the PO.

- Override the PO amount if the invoice only covers a portion of the full amount, then Save. Click on the box to the left of the invoice header and Submit the invoice for approval.

- Once the invoice has gone through the necessary job manager and/or client manager approval, it needs to be "final approved" to post to Accounts Payable. You can click on the actual invoice to bring up the form or simply select the invoice from the list and click Approve.

- Once the supplier invoice is approved, the transaction will post as follows in the MAIN office.
| Account | Job No | Task Type | Debit | Credit |
| WIP | JSMGENV0001 | Design | 10,000.00 | |
| Accounts Payable - Interoffice | JSMGENV0001 | 10,000.00 |
Interoffice Payable and Receivable Reconciliation:
This workflow creates a receivable in the studio office and a payable in the main office.
- If funds are transferred between the 2 offices, you will pay and receipt the invoices the same way you would with any supplier or client using the banks accounts for each office.
- If there are no funds transferred, then you will use the “Interoffice pass-through account in lieu of a cash” that you created in step 6c under Master data set up as the bank account to pay and receipt the invoices created.
Link to create a payment:
https://knowledgebase.counta.com/knowledge/payments-how-to-create-a-one-off-payment
Link to create a receipt:
https://knowledgebase.counta.com/knowledge/receipts-how-to-create
Interoffice Reconciliation Reporting:
Once the Main office reconciles the interoffice supplier invoice with the PO for Design, the system will show that this interoffice transaction has been reconciled.
If a PO was not generated for Design, you need to ensure that the Task Type used in the Supplier invoice matches the Task type on the Estimate.
- Navigate to General Ledger>General Ledger Reports and choose Interoffice Reconciliation Report under Transaction Reports.
- Enter the date parameters, choose the Main and Studio offices from the list and make sure to select Interoffice Billing Reconciliation.

- The system automatically reconciles the interoffice billing transaction between the Studio and MAIN offices.

Timesheets
- Primary office employees will record time against the parent job.
- Studio employees will record time against the sub job
Client profitability reporting can be done for the client for both offices.